SEO is the acronym for Search Engine Optimization and consists of a combination of techniques to make a website rank among the top positions in search engines, based on a keyword. WordPress is the most used content management tool in the world.
In this article, we’ll tell you everything you need to know to do a complete SEO job for your WordPress website.
1) How to improve the SEO of my WordPress site? ➤
There are three important skills to perform better with SEO. They are: Code optimization, file manipulation and knowledge of HTML, CSS and Javascript (OnPage optimization).
To edit your website files, you will need:
- Login and password for the website or CPANEL hosting
- FTP login and password
If the site uses a CMS (content management system), such as WordPress, Joolma, among others, keep the login and password for accesses to the administration panel nearby.
Important: there are five different access levels for WordPress:
- Administrator access
- Editor access
- Author access
- Employee access
- Subscriber access
In order to be able to fully optimize the site, we must have administrator access. This will be important for installing optimization plugins, which we will use later on.
2) How to configure SEO optimization plugins on my WordPress? ➤
The second step is to make the initial settings. The following tips are for websites that use WordPress:
Install WordPress SEO Plugins ➤
There are two main SEO plugins: Yoast SEO and All in One SEO. It is important to choose only one of the two to avoid conflicts. They basically have the same functionality.
Generate sitemap.xml file
The sitemap.xml is a file in XML (eXstensible Markup Language) format that has the purpose of mapping and listing the pages of your website in a specific format.
This file will be sent in the future to the Google Search Console tool, which will read the file, crawl and rank the website’s pages.
How to generate sitemap.xml file in Yoast SEO?
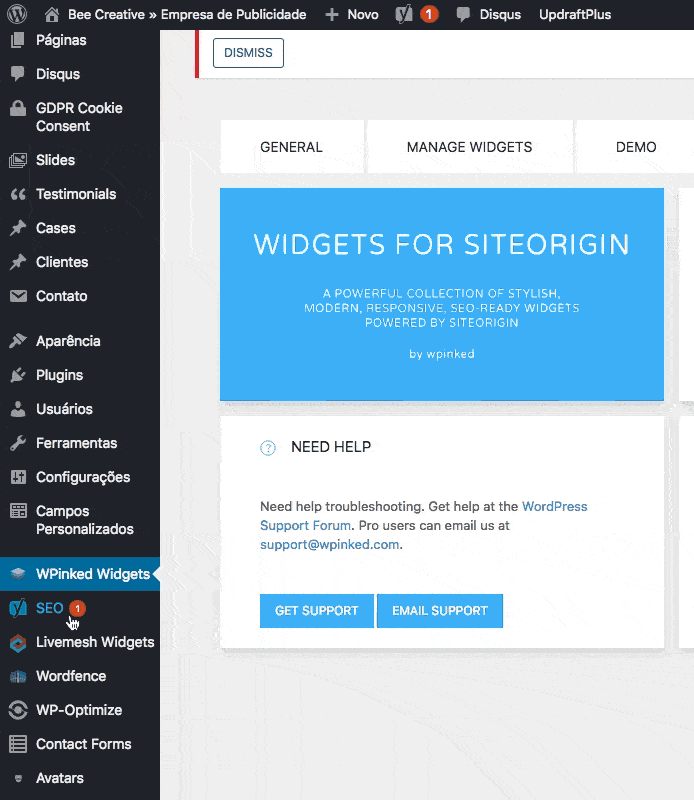
- Log in to your WordPress site
- Click “SEO” and then “General”
- Click on the “Resources” tab
- Toggle the option “Sitemap XML“. To activate the feature, set the switch to “On”.
- Click on “Save changes”
After that, refresh the page and go back to the same place: SEO > General > Resources.
Go to the sitemap.xml area and click on the icon with the question mark.
You will see the link “See the XML sitemap”. This is your sitemap.xml. If you click on it, you will find a page with several links to your site.
The sitemap.xml URL pattern is www.yoursite.com.br/sitemap.xml

How to generate sitemap.xml file in All in One SEO?
- Log in to your WordPress site
- Click “All in One SEO” and then “General Settings”
- Click on the “Feature Manager” tab
- In the XML Sitemaps option, click on the “Active” button.
- You will get the following message: “All in One SEO Options Updated.” Your sitemap will be created at this point.
- Click on the XML Sitemaps link. This option will appear under “General Settings” of the navigation menu under “All in One SEO”, after the previous steps.
- You can then choose sitemap settings as needed (we recommend leaving default).
- Click the “Update Sitemap” button to save your changes. Wait for the message “All in One SEO Options Updated” to appear to complete the task.
As with the Yoast SEO plugin, the sitemap.xml URL pattern is www.seusite.com.br/sitemap.xml
How to generate the sitemap.xml file automatically without using plugins?
If you don’t want to generate a sitemap.xml using plugins, you can generate a sitemap.xml file through the website https://www.xml-sitemaps.com/.
Just put your website’s URL in the indicated field and click on the “START” button.

This link will travel through your website and generate an XML file.
Its free version runs up to 500 addresses. For larger sites, use https://pro-sitemaps.com/.
Special tip: what are the best plugins to work SEO on my WordPress?
To do a thorough SEO job, don’t just install SEO-specific plugins (like Yoast SEO and All in One) on your site. These plugins are great for you to work with titles, descriptions, analyze your site architecture, and generate sitemap.xml files. But the number of ranking factors is so diverse that these plugins end up not being enough for a more refined treatment. Below is a list of the best plugins for you to install on your WordPress that will help improve your ranking:
WP Rocket
It is the most complete speed optimization plugin for websites built on WordPress. The plugin allows you to create a powerful cache storage, minify html, css and javascript files (making them lighter), optimize image loading through automated LazyLoad techniques, preload files and URLs and database optimization .
Autoptimize
It is an alternative to the WP Rocket plugin. It has the same functional tables of the previous one. It might be interesting to work together. If your site doesn’t accept the WP Rocket settings well, you can combine the use of both plugins until you find the perfect combination. Our best performance experience on our customers was to let WP Rocket do all the optimizations, with the exception of CSS file minification, where we chose to use Autoptimize. Obviously, this can change from site to site and this combination should be done by a specialized team.
Imagify
This plugin handles the images you upload on WordPress, reducing their weight as much as possible without losing quality. Images are often a performance bottleneck. The lighter your images are, the faster your site will load and the better your chance of ranking well in search results.
Schema & Structured Data for WP
Schema & Structured Data for WP adds Google Rich Snippets markup according to Schema.org guidelines for structuring your site for SEO.
AMP for WP – Accelerated Mobile Pages
AMP for WP automatically adds Accelerated Mobile Pages (Google AMP Project) functionality to your WordPress site. AMP makes your website faster for mobile device visitors.
How to configure Google Search Console? ➤
Google Search Console, formerly known as Google Webmaster Tools, is a very useful service for SEO professionals with knowledge of web development.
This tool allows you to check your site’s indexing status (with search filters, visibility, and ranking), some UX optimization errors (like font size, responsiveness) and some page errors (like non-existent pages, broken links etc.) .
To use Google Search Console, you need to have a Google account.
Log into the Google Search Console website. Then click on “Start now”.
You will be redirected to a screen where you will be asked to enter the URL of the website you want to monitor.
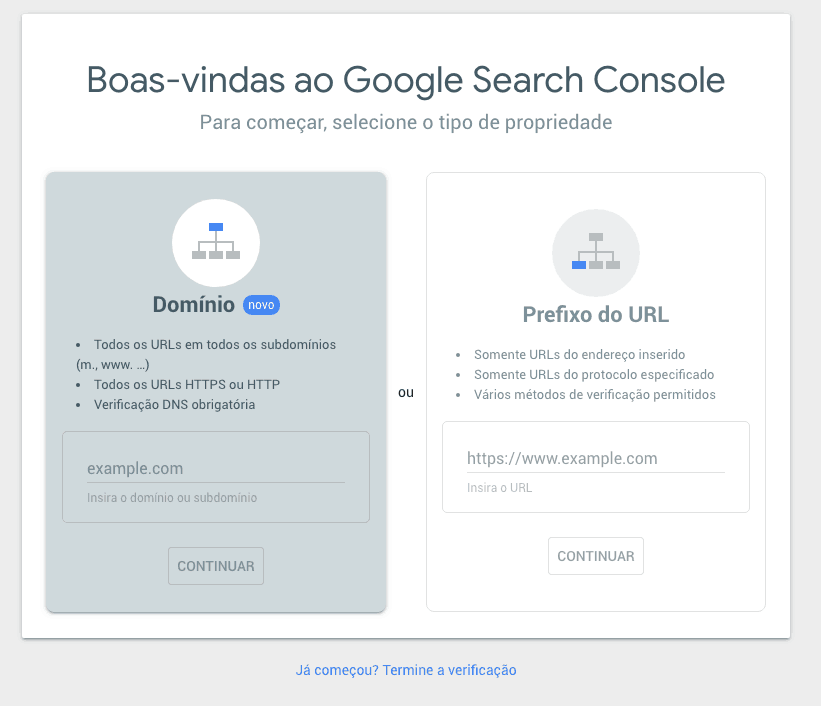
From this step on, you will have to verify website ownership. There are 5 methods of verifying your URL with Google Search Console:
- By HTML file
- By HTML Tag
- By Google Analytics
- By Google Tag Manager
- By the domain name provider
All instructions on how to proceed are on this page. Choose the one you think is best.
Heads up: It is important that you have the administrative access described in step 1 of this article at hand.
How to submit sitemap.xml to Google Search Console? ➤
After making the initial Google Search Console settings explained above, it’s time to upload your sitemap.xml to the tool.
On the left sidebar, go to the Index tab and then the Sitemaps link.
You will see it described: “Add a new sitemap”. Enter sitemap.xml in the indicated field and click Submit.

Now just wait for Google to process your request.
After that, a content box will appear with some details of the sitemap.xml processing indicating the date of submission, the last read, the status, and the number of discovered URLs.
It can take anywhere from one to three days to complete this process – be patient and, in the meantime, move forward on other fronts.
3) How to do SEO analysis? ➤
Run an initial report using Google Analytics ➤
Check the current website performance in Google Analytics, with a visit report and analyze:
- Average visits per day
- Average hits per page
- Most visited pages
- Average pages visited per user
- Bounce rate
- Average time each user spends on the site
The ideal is to have a report for the last 3 months.
These data will be your initial reference and you will be able to follow the evolution of the site as your SEO optimization project progresses.
How can I analyze my page’s performance with Google PageSpeed Insights? ➤
PageSpeed Insights is a free tool from Google made for developers. It helps the website optimization by giving performance metrics.
The tool embeds data from the Chrome UX report and splits your reports into two main metrics: display and load. It assesses a page’s compliance with common best practices for performance and calculates a score ranging from 0 to 100.
There are several options available for optimization. The developer should mainly analyze the rules:
- Enable compression
- Reduce resources
- Optimize images
How to optimize images? ➤
The speed of a website’s loading time depends on several factors, including the size of files that are downloaded at the time of access.
Sites with very heavy images crash loading. So, check out two tools for optimizing very large images:
For JPEG images
For PNG images
The advantage of these tools is that you can reduce the weight of a large image by up to 90% without losing quality.
Download the images from your website, optimize them using the tools above, and send them back to your server (with the same name, to replace them when the transfer is complete).
How to do a keyword survey for my SEO work ➤
Once you have a good understanding of the niche in question, it is important to make a list of keywords relevant to that type of business. For this, you can use the company’s own employees, leaders, comments on social networks and even the website.
Also see our tips on using social media for business.
Identifying related keywords ➤
With all the keywords in hand, now it’s time to look for variations of that term and analyze if the site in question already uses the best ones.
To see keyword suggestion, we recommend the Ubersuggest tool.
The tool is free.
Just put the term in the field provided, select the language and click on search.
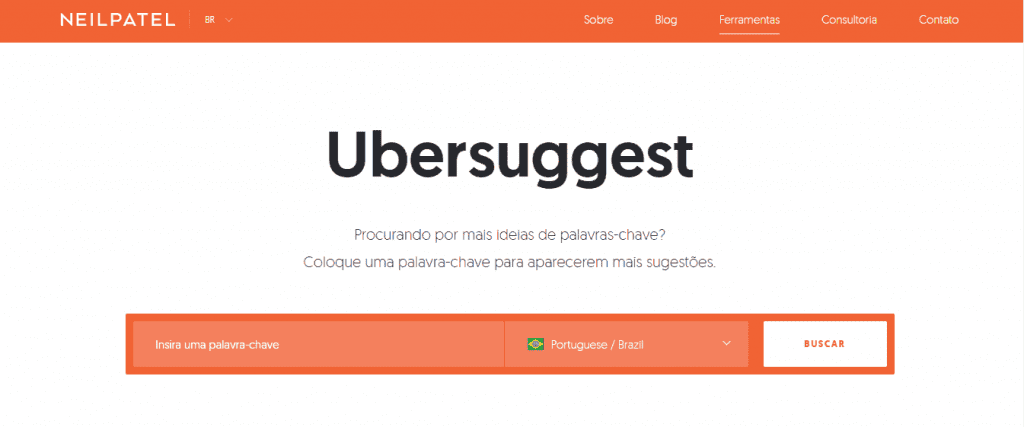
The tool will return search volume, seasonality, and cost-per-click (CPC) data.
In addition to this information, you will have at your disposal hundreds of suggestions related to the term, with the same data.
Identify keyword trends ➤
To identify keyword trends, the best tool is Google Trends. A free tool that presents information and graphics related to a search term.
There is information on average search volume, search volume over time (great for identifying seasonality), region-based search volume, and search trends.
To use Google Trends, enter your search term and click search (the magnifying glass icon).
You can even compare 2 search terms and see which one is the most beneficial for your business.
4) How to produce SEO optimized content? ➤
How to work the keywords correctly ➤
How to work the keywords correctly
Once you’ve identified all the keywords and the best variations, it’s time to create content for the site.
This is the most important part of SEO – it’s often said that “content is king”. It’s no use being completely aligned in the structural part and the published material being average. Its performance on search engines will be average as well.
It is important, in this topic, to break some SEO myths.
The main myth is to treat content with search engines in mind – this is one of the most primary and common mistakes SEO professionals make.
SEO professionals who correctly identify a range of keywords and repeat them haphazardly throughout the site, without regard for context and quality, even put the site at risk.
There may be punishment by search engines, for falling into the error of “spam words”, that is, when the site repeats the same keyword on a page, thinking that this will give it more relevance.
There is still another form of punishment: over optimization.
When creating content, think of the user. It is important to do a persona study before producing the texts. The tip is to value quality information for the user (and not for search engines) – good ranking will be a consequence. Check out 6 content production tips to boost your brand.
Get to know Bee Creative‘s content marketing and inbound marketing strategies.
5) The concept of EAT (Expertise, Authoritativeness and Trustworthiness) ➤
The principles of good positioning of content on Google, present in its Search Quality Evaluator Guidelines, is guided by follow EAT (Expertise, Authoritativeness and Trustworthiness).
Expertise
Expertise is the requirement for deep knowledge in a particular subject. Digital marketing content, for example, will have more relevance in search results if the writer is a recognized expert in the field. Algorithmic valuation of authority figures on a particular subject is a relatively new policy at Google.
What can I do to improve expertise?
To increase the authority of your articles, value experts’ names in the footer, in the article’s signature. Specialists are people, they have a curriculum, academic training and prestige. Google is able to cross-reference information and assess the quality of the article by the quality of the person who writes it.
Authority
Authority, while it can be confused with expertise, has more to do with its social validation. How much people will refer you to other sites and your positive and negative reviews.
What do I do to improve authority?
The old construction of link building still determines the value of your authority. The expertise factor, combined with authority, will be decisive for good positioning.
Confidence
The third element here is trust. How much “truth” is included in your articles, if you reference your sources, if the arguments of your articles are supported, if your articles are original and not copied.
What do I do to improve confidence?
To build trust, be honest with your content. If you were inspired by an article to do yours, don’t be afraid to cite it (linking to it). Don’t be afraid to give audiences to other sites and think of the web more as a collaborative environment than a competitive one.
Do not disclose false information or information of dubious origin. Make sure everything you write is accurate.
6) How to perform on-page analysis on my website? ➤
While analyzing keywords, content, and performance, you should be doing structural analysis on the site.
There are great tools on the market that save time for these analyses, such as Hubspot and Screaming Frog.
These tools can scan your website and analyze the implementation of titles, descriptions, headings (H1, H2, H3…) and alt tags in the images.
The Screaming Frog Tool is software that you install on your computer. Its free version allows analysis of up to 500 URLs.
Check out some of the most relevant notes of this tool:
6.1) Title Analysis (<title> tag) ➤
- The tool checks if the page has titles (the famous <title> tag) on every page.
- The tool checks for duplicate titles. That is, when two or more pages have the same title.
- The tool checks pages with titles over 63 characters long.
How important is the <title> tag for SEO?
The <title> tag is the most important from an on-page SEO point of view. It is what indicates its content and appears prominently for users in search engines.
All keywords inserted within this tag carry a lot of weight to search engines.
It is good practice to place your keywords farthest to the left and your brand (signature) farthest to the right, this will emphasize the words related to your product or service and increase your click-through rate.
Titles must be clearly written, accurately expressing the content of the page (the user must know what the content is about even before clicking on your link).
It is possible to make SEO branding strategies using this tag and the best practices can also be tested in Adwords ads.
Over time, you will see that the use of SEO in the title tag aligns very well with the SEM (Search Engine Marketing) strategy.
What is the problem with duplicate titles in SEO?
Duplicate titles are misunderstood by users (after all, why would different pages have the same title?). Therefore, they are not well regarded by search engines.
Generally, what happens when search engines find two identical titles on different pages is called “cannibalization”. That is, the search engine chooses only one page to display on and suppresses the other.
This problem is very common in blogs when you have a pagination.
To work around this issue, it is recommended to use the canonical URL tag.
The syntax of the canonical URL tag is as follows:
<link rel=”canonical” href=”https://yourpage.com/main-page” />
You must place this tag inside the <head> tags.
What’s the problem for SEO with titles that are too big?
Very large titles in SEO are a problem. Whenever search engines come across a very long title in the search results, it suppresses an excerpt, replacing it with an ellipsis.
By hiding a part of the title, you take keywords off the search radar – both from the user and from the engines.
6.2) Descriptions Analysis ➤
- The tool checks if the address has descriptions (meta tag description) on all pages.
- The tool checks for duplicate descriptions.
- The tool checks pages with titles over 63 characters long.
How important is the meta tag description in SEO?
From a search engine keyword radar perspective, the terms entered in the descriptions are invisible. Although they are visible to the user in search results, they have no direct influence on search engines.
However, it is a mistake to disregard them, as they are a complementary call to titles and are an important factor in the user’s decision to click.
The ideal is to use the description meta tag as complementary information to the tag information, giving more details of the page and reinforcing its meaning.
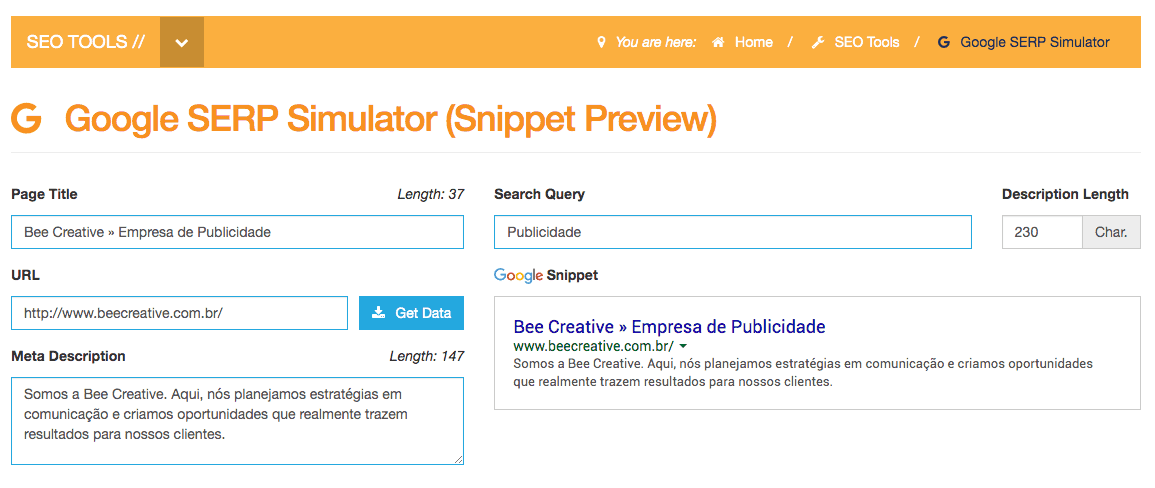
How to test title tags and descriptions and descriptions for SEO?
There are great tools on the market for you to simulate a SERP (search result) view.
To create appropriately sized titles and descriptions, use Techincal SEO’s Google SERP Simulator tool:
6.3) Analysis of headings ➤
The tool checks that:
- The pages have the H1 and H2 tags
- There is duplication of H1 and H2 tags
- There are multiple H1 and H2 tags on the same page
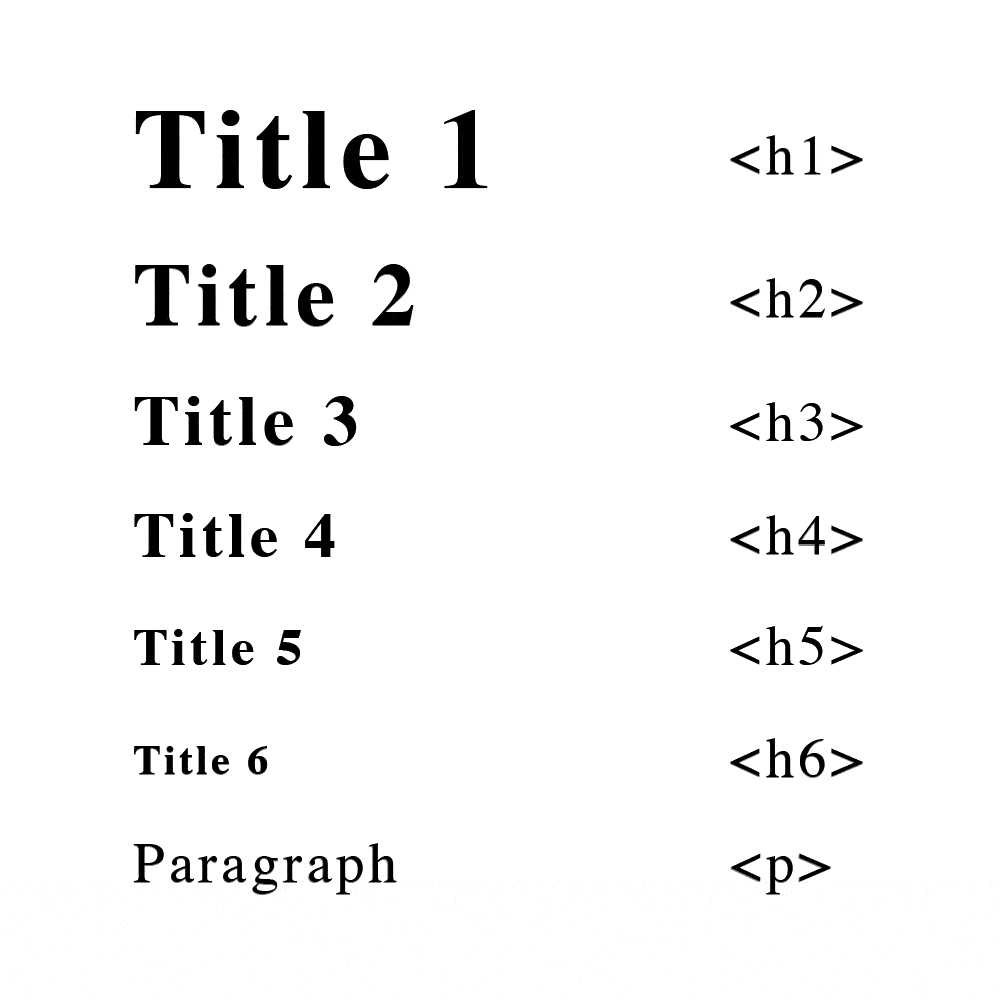
Understanding the H1, H2, H3, H4, H5, and H6 Structure on a page
The structure of HTML headings is similar to the capitulation structure of a book or academic article.
There is a hierarchy of content organization that runs from H1 (most important) to H6 (least important).
The title of the document (page) must come in H1 and it must be unique on the page (just like a book, which has only one title).
Frequently Asked Question: Do titles and H1 need to be identical?
Answer: not necessarily. In fact, it would even be interesting to work variations between the H1 title and the page title in the title tag to explore a wider variety of keywords. The H1 title fulfills a more direct function with the content, while the page title is more oriented towards summarizing the page in the SERPs, also fulfilling a CTA (Call to Action) function.
The main subtitle must be in H2, it is generally recommended that it be unique as well – but this is not mandatory.
The organization of the following subtitles must respect a hierarchical order, H3 must include H4, H4 includes H5 and H5, H6. It is not mandatory to use all levels – only if the content requires it.
How important is the SEO of a page with well-structured headings?
The importance of well-structured headings is not just semantic or aesthetic, computers with assistive technologies (suitable for the visually impaired) use headings as content guides.
A content with a bad headings structure, despite being often indifferent for those who do not have visual impairment, does not generate a good experience for those who do.
Search engines value a site with content that is not just quality, but readable and inclusive.
6.4) Image analysis ➤
- The tool checks how many images are larger than 100 KB
- The tool checks images for the ALT tag
How important is the ALT attribute on images?
As with well-structured headings, the importance of the ALT tag is inclusive. As visually impaired people cannot see an image, they need the ALT tag well set.
The ALT tag must act as a description of the image, which will be transformed into an audio description for assistive technologies.
Important:
Not all images need to have an ALT description. The images you need are those that are illustrative or that complement the content. Generally, we have websites with images that are purely decorative – these can NOT have an ALT description.
Read the accessibility best practices manual for images and our post: 5 practical tips to make your website more accessible.
Tools like Screaming Frog SEO point out as an error any image that does not have the ALT tag, but it is up to the professional to know which ones should or should not be filled.
6.5) How to do UX analysis on your WordPress site? ➤
UX is short for User Experience. It is important to enter the site, page by page, test all the features and check the possibility of improvements. The ideal is to take a person who has never accessed the site before and ask him to do a navigation. Check your reactions and note your difficulties.
Some tools are great for doing this analysis. The main one is the heatmap:

The heatmap shows a graphical representation of data in which the individual values contained in an array are represented as colors.
Areas where the user clicks or where they hold the mouse longer get warmer colors. You can analyze whether the main points of your site (such as buy or convert buttons) are being used, and if not, you can rethink the layout, for example.
The only downside of heatmap is that its free version is very limited. For a more accurate analysis, you will need to purchase the paid version.
Anyway, it’s worth studying about UX. There are many interesting books on the topic and in Google’s own article documentation you will find great content.
6.6) How to do link building? ➤
Link building is the work of linking a website or a page. That simple.
There are two types of link building jobs:
- Link building from your website (on-page work)
- Link building towards your website (off-page work)
In other words, your website’s link building is divided into: internal linking (pages on your website that link to other pages on your website) and external linking (pages on your website that link to pages outside your website).
Internal linking decreases the bounce rate by allowing the user to navigate between tabs more fluidly – in addition to assigning different importance depending on the number of links a page has.
External linking, on the other hand, allows a link with external sites and helps Google to define its market niche, essential for a more specialized search.
Link building to your website is achieved through content partnerships, preferably organically.
Google considers a website’s reputation and authority, among other things, by the amount of (good) links it receives. A link from one site to another is the equivalent of a citation in an academic monograph. If your site is referenced by others with authority on the subject, some of their authority passes to you.
Important: beware of the link building strategy
Be careful not to overdo a link building strategy. Remember that it’s not just the quantity of links that matter, but the quality of them.
Google still severely punishes practices such as link trading, spamming, etc.
Internal and external linking within your website must be logical and contextual. Linking to your website too. The best strategy to get links on your site is not to have any strategy. Make quality content and people will naturally refer you.
6.7) What are silos or “topic clusters” in SEO? ➤
The silo structure of a site is an architectural organization technique.
The homepage is the most authoritative on your site. You place your blog’s main links (the categories for each subject) on the home page, which in turn link to the posts.
So, some of your homepage’s authority is passed directly to your content.
Imagine you have a blog on your website. To make a structure of silos, you must follow these steps:
- Take a look at all your blog posts and sort all your content by subject or content category. Use a spreadsheet to organize it better.
- For each content category, make a page, with an optimized title, a subhead, and introductory text, with at least 2 or 3 paragraphs. These pages will be the “silo” pages of your website (or “topic cluster”).
- At the bottom of each silos page, show all posts for that subject. Use WordPress categories or tags to filter this, it’s pretty simple.
- On your home page, place links from each silos page you created. Thus, home page authority will move to each topic cluster and in turn increase the relevance of each post.
Meet Bee ➤
Here, we plan communication strategies and create opportunities that really bring results for our clients. Learn more.